Entering a Receipt/Docket or invoice/ bill -- This is a "normal" receipt. we bought something, got the goods, paid for them, at end of day handed receipt to our accounts person.
e.g. fuel, Bunnings, Woolworths, ice etc. NOT purchase orders.
Entering supplier invoice bill-- This is a bill, it was sent to us via email or normal mail. e.g. bill for an account like forklift hire, gas supplies, Loscam pallets etc.
We now have to make a payment. NOT purchase orders.
Adding supplier Receipt/Invoice bill -- This is a receipt, or a combined bill-receipt,sent to us by mail or email.
It does not require payment.
Payment has already been made either because we received a billand we paid it, this is just a receipt confirming payment OR
Make sure it's the icon that has AccountRight 2020.1 Double click to open.
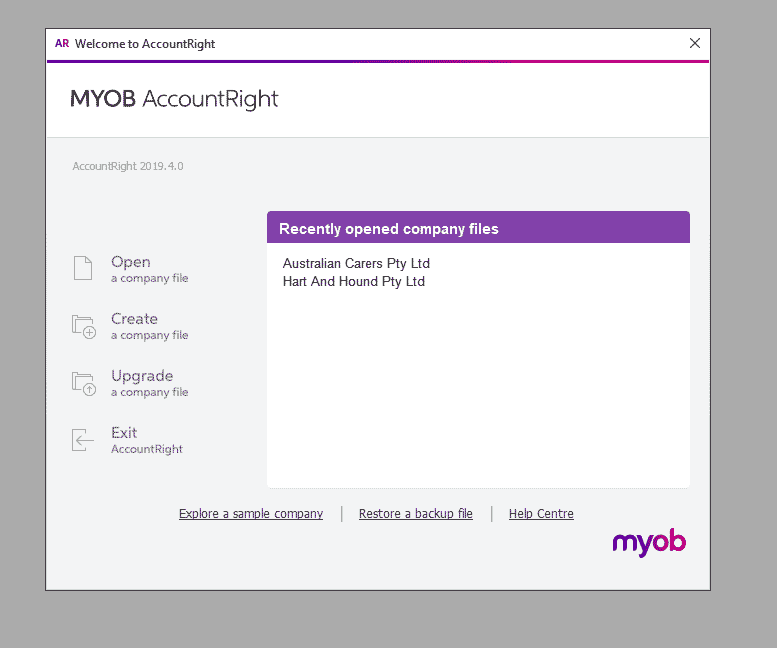
Select: Australian Carers Pty Ltd
On next screen, enter your email address (most likely already in there) and Password.
Please do not tick [Stay signed in for 12 hours]
Click [Sign in]
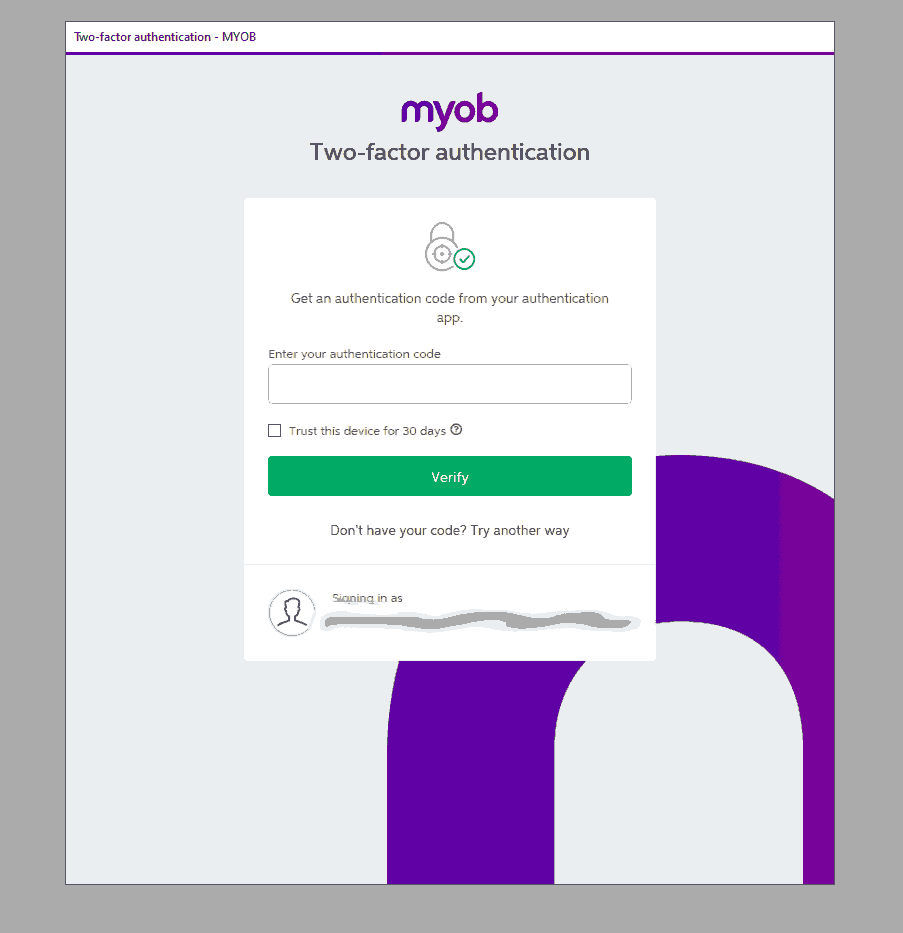
You will be asked for authentication.
Click the Authenticator app on your mobile
Get the number from the app and enter in the "Two-factor authentication" window.
Please do not tick Trust this device for 30 days"
This code refreshes every 30 seconds, so if it did not work, that code my have expired and you need the new one.
(There is a little countdown clock on the right-hand side. Wait for the new code, then enter it into the MYOB window)
And... You are in.
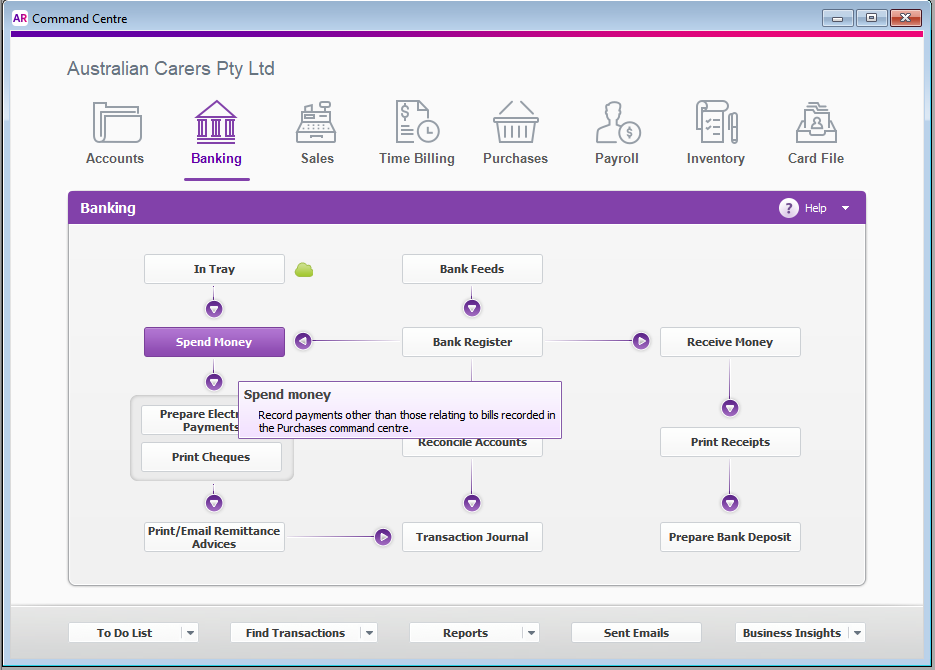
The program should open with the "AR Command Centre".
Start working
Create New Supplier Card
In Command Centre, Click [Card File]
Click [Card List ]
Check that the supplier is not already there. If the supplier is not in there, click Top Left-Hand [New]
In the new window: Under the Profile Tab, select
Card Type: [Supplier]
Designation: [Company] or Individual]
Fill in the rest of this tab,
Goto [Buying Details] Tab.
On the right-hand side, enter the ABN
Click somewhere else,
Next to the ABN field should appear a [ABN] Balloon.
Hover over this and check that the details confirm the company you are entering.
Confirm the Status as being Active,
Check that they are registered for GST. If any of these details is not right, see John.
Check the TAX code, (usually GST)
On the [Payment details] Tab:
If you have it, enter BSB and account number and the Account Name.
Now click on [OK]
Adding supplier invoice
This one looks simple but can be a bit tricky, because you can quickly create hundreds of unnecessary suppliers.
It depends on what sort of expense this relates to.
There are 4 different types:
Is the docket/invoice/receipt from a supplier like Bunnings, Officeworks, a petrol station, a supermarket?
if NO, goto next line
Have we received this invoice in the mail or email, and this invoice now needs to be paid?
Example: Loscam Pellets, Supagas, Rentcorp etc.
if NO, goto next line
We received an invoice, which has already been paid, e.g. an automatic deduction.
For example Telstra, TPG, Electricity account etc.
The invoice should say paid; however, that is not always the case.
Be careful, we don't want to enter or pay the invoice twice.
We just need to enter the invoice so we can reconcile against the bank account.
is this only a receipt and the invoice is already in the computer?
Don't enter this in the computer.
Just file the document.
- NOTE: If a PO (Purchase Order) was created, we do need the supplier. GO HERE.
Enter invoice for small amount i.e. receipts for which we did not create a purchase order (PO):
NOTE: We need a "TAX INVOICE" for any amount over $82.50 including GST.
A Tax Invoice has to say "Tax Invoice". Furthermore; The sellers identity or business name, their ABN, the date the invoice was created and a description of the items being sold including quantity and price and the GST. If not, see John.
Look at the receipt: Circle the date and the card number, with pencil or ballpoint pen, not a Sharpie.
This makes checking for the next person a lot faster, especially when receipts start fading.
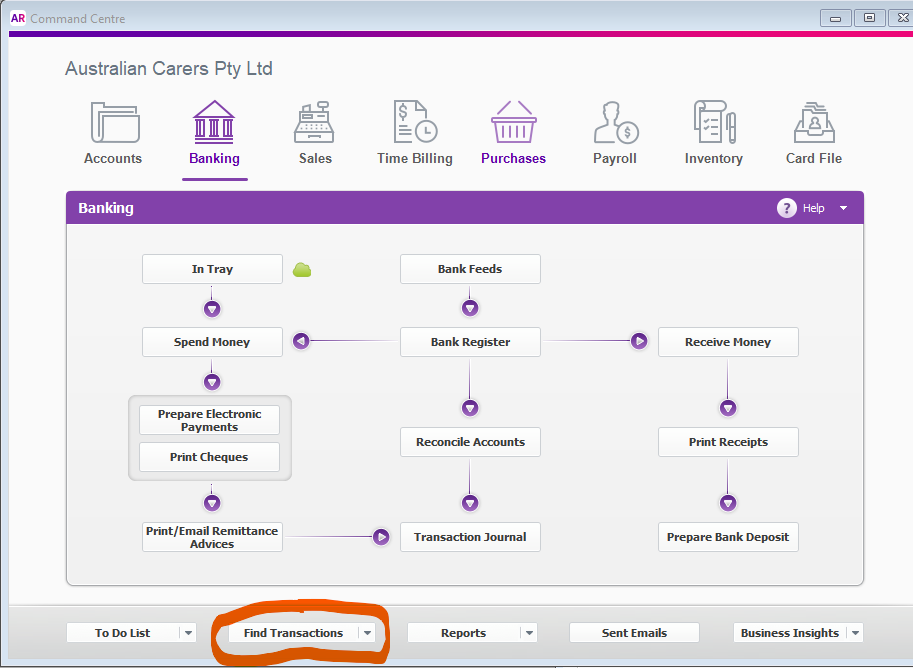
In the [AR Command Centre] select the Banking icon.
Click on [Spend Money] -> a new window opens:
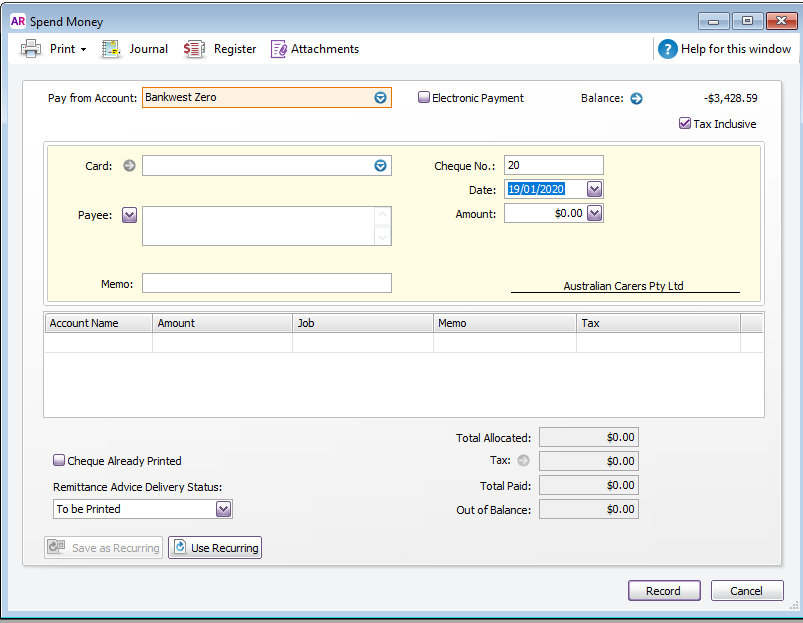
Check that the [Pay from account] is correct
Usually BankWest Zero; However
#
1447 - BW RV Personal CAB
# 1932 - BW RV AC
# 3202 - CBA NT Personal CAB
# 3474 - BW JV AC
# 3623 - BW HH CAB
Check that the [] Tax Inclusive box has been ticked where applicable
Card: Start typing the first letter(s) of the name of the supplier
If the supplier is NOT in there,
Check to see if the Invoice/Receipt shows a different name
For example, Shell might be under Coles Express
Or the invoice might have a Trading Name rather than a "Legal Name"
Or the invoice might have an abbreviation rather than the full name
For example, NDS could be under "National Disability Services"
Do not make a new card.
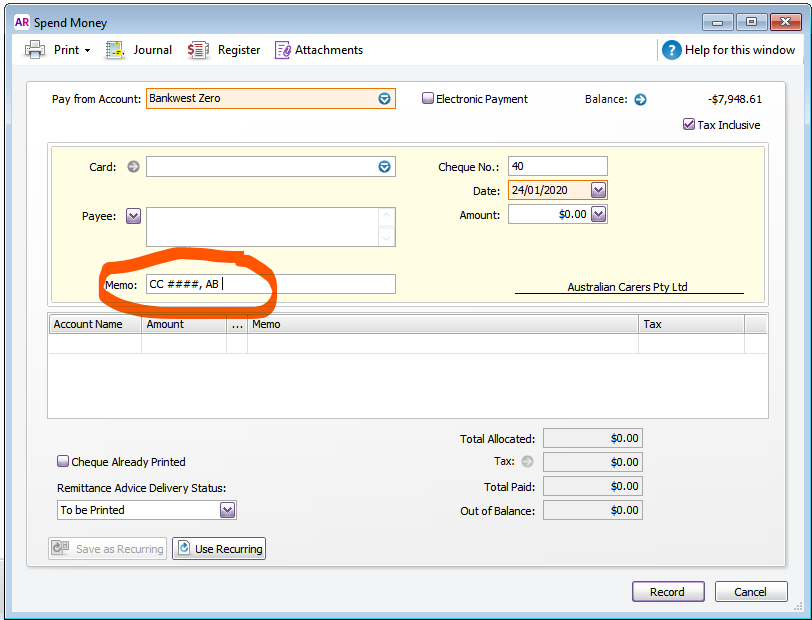
In the Memo Field, enter the 4 digits of the Credit Card, that you circled earlier, followed by the card holder's initials.
Enter the date.
Clicking any key other than a number key, appears to put in the current date.
Use [+] and [-] to increase or decrease date by one.
Enter the full amount including any GST
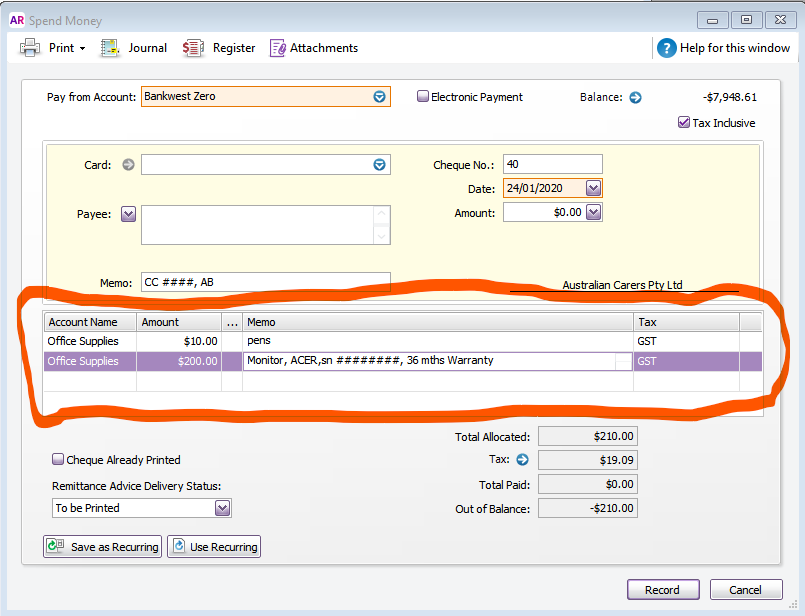
Under the drop down for the Account Name select the most suitable EXPENSE account.
If a bill contains multiple items put them on separate lines.
Do not create a new account.
If you feel a new account ought to be created, see John.
Common accounts are:
advertising/marketing -- items like
Flyers
Business cards
Posters
Printing
Cleaning Expenses - Speaks for itself
Electricity Expenses - Speaks for itself
Insurance - use the most appropriate sub category -- or see John
Internet
Motor Vehicle expenses - use most appropriate sub category -- or see John
Office Supplies - office consumable like:
Paper
toner
pens
staples
manilla folders
filing cabinet
office chairs
keyboards
monitors
computers
anything that is used in the office and is below this year's Instant Asset Write-off Threshold
(currently $30,000)
Postage and freight (includes couriers)
Staff Amenities -
Coffee
Tea
Sugar
Milk
Biscuits etc
NOT entertaining of any kind, for clients and/or for staff. i.e. no Christmas Party expenses.
When in doubt ... See John.
Staff training - This needs to be approved BEFORE the expense in incurred.
Subscriptions - speaks for itself
Telephone expenses
Land line
1800 numbers
Mobile Phones -- Note: There has to be a private component. If not, see John
Travel and Accommodation
Flights
Car Rental
Hotel accommodation, BUT NOT meals. When in doubt ... see John.
Uniform - speaks for itself
Wages and Salaries
Anyone employed by us as Permanent or Casual,
But not Sub Contractors or workers that provide us with an invoice quoting an ABN.
Enter the amount
Enter a brief description of the items. (Be careful when pressing [ENTER]. It may look like it deleted the entry; it did not)
Enter as much or as little information as is sensible given the purchase price.
If its $2 worth of pens, "pens" will suffice.
Milk is "Milk", not "Pauls Farmhouse Gold Full Cream Milk Unhomogenised 750 ml best before 2 March 2020.
If its a $10,000 computer server, a bit more information is appreciated.
Anything with a warranty over one year, please put the warranty terms on there.
Please use some common sense.
If we possibly have to claim on warranty, "Computer parts" is not as helpful as "WD Gold 12 TB 5 year warranty and possibly a serial number".
Under the "TAX" column, enter the appropriate tax code.
Most likely this is [GST]
Some staff amenities like milk can be GST exempt and would have the [FRE] code.
Biscuits probably not.
In doubt?? -- See John.
Finally, before [Recording] the expense, the [Out of Balance] amount should be zero
Click [Record]
If everything went well, you should have a new [Spend Money] window.
Take the receipt, stamp [ENTERED] on it WITH the DATE IT WAS ENTERED INTO MYOB, and if its a small receipt, fold it and stick it in the envelope for that month.
If it is a large A4 type of receipt, check that there is not already a file with that company name in the filing cabinet.
If there is, file the (Stamped) receipt at the back of the file.
This is an invoice, it was sent to us via email or normal mail. e.g. invoice for an account like forklift hire, gas supplies, Loscam pallets etc.
We have to make a payment sometime in the future.
If we have already paid for it, don't use this, but click here
This invoice is
NOT related to a purchase order (PO).
Go to "Command Centre"
Use the [Purchases] tab.
Select [Enter Purchases]
New window:
Purchase Type = Bill
Find the Supplier:
supplier is not in there,
check spelling,
look for part of the name
check to see if the invoice shows a different name
For example, Shell might be under Coles Express
Or the invoice might have a Trading Name rather than a "Legal Name"
Or the invoice might have an abbreviation rather than the full name
For example, CBIA would be under "Craft Beer Industry Association"
If the supplier can not be found, see John. DO NOT CREATE A NEW SUPPLIER.
If you do find the supplier:
Click on the supplier
Make sure [] Tax inclusive is ticked
Enter the date of the invoice
Enter the invoice number
Enter the description
Select an expense account. Do not create a new account. If you feel a new account ought to be created, see John.
Common accounts are:
advertising/marketing -- items like
Flyers
Business cards
Posters
Cleaning Expenses - Speaks for itself
Electricity Expenses - Speaks for itself
Insurance - use the most appropriate sub category -- or see John
Internet
Motor Vehicle expenses - use most appropriate sub category -- or see John
Office Supplies - office consumable like:
Paper
toner
pens
staples
manilla folders
filing cabinet
office chairs
keyboards
monitors
computers
anything that is used in the office and is below this year's Instant Asset Write-off Threshold (currently $30,000)
Postage and freight (includes couriers)
Staff Amenities -
Coffee
Tea
Sugar
Milk
Biscuits etc
NOT entertaining of any kind, for clients and/or for staff. i.e. no Christmas Party expenses.
When in doubt ... See John.
Staff training - This needs to be approved BEFORE the expense in incurred.
Subscriptions - speaks for itself
Telephone expenses
Land line
1800 numbers
Mobile Phones -- Note: There has to be a private component. If not, see John
Travel and Accommodation
Flights
Car Rental
Hotel accommodation, BUT NOT meals. When in doubt ... see John.
Uniform - speaks for itself
Wages and Salaries
Anyone employed by us as Permanent or Casual,
But not Sub Contractors or workers that provide us with an invoice quoting an ABN.
Enter the amount
Ignore the Job field
Check that the Tax code is correct
Continue adding all items
If we have been charged freight, add this below the [Subtotal] field.
When all items in there, check the [Out of Balance] amount. This should be zero.
When everything is ok, upload the invoice by clicking at the top of the window, [Attachments]
Click [Record]
Stamp the invoice with the [ENTERED] Stamp.
File the document.
Cannot log in to MYOB:
Go see John
Paying an invoice
After we have paid the money, cash, check or electronic, not before,
Go to "Command Centre"
Use the [Purchases] tab.
Select [Pay Bills]
In the new window:
Check the name of the [Pay from account] is correct
Find the supplier
check the date
check the description , the invoice number and the status.
If the status is not [OPEN] something is wrong. It might be that the invoice is already paid.
If there is no other invoice listed or you cannot work it out, ... See John.
below the date, enter the amount you need to pay.
That should be the same as the amount [owed]
In the description, click on [Applied].
This should enter the amount
At the bottom, click on [OUT OF BALANCE]
This should now be zero. If not, something went wrong. do not save this, correct it and if you cannot, see John.
Upload the payment advice from the bank (Top, Click [Attachments]
If everything is ok, click [Record]
Put the [PAID] stamp and file the document.
Filing documents in the filing cabinet:
Typically only one (1) person does the filing.
That way we can blame him or her.
The reason is simple: we want to be able to find the documents again.
In order to do that, there have to be some rules.
Otherwise we could file under several entries and never find the document again, or create many folders for the same company.
Example:
John Brown's Air conditioning Supply and Repair Shop Pty Limited.
This could be filed under
John
Brown
Air conditioners
Supplier or
Repair
Obviously there needs to be some consistency, hence the rules.
Here are the rules most applicable to our needs:
Names of individuals:
Ignore titles (Mr, Ms, Prof., Dr, Sir etc.
file under surname, then given names, then title
So Mr John William Brown would be filled as: Brown, John William, Mr
"nothing comes before something" - John comes before Johns
Mr John W. Brown comes before Mr John William Brown
Names consisting of two words or hyphenated names are treated as one word
Brown-Smith becomes BrownSmith
Von Smith becomes VonSmith
Names of Businesses
File as per their letterhead, usually a trading name.
John Brown Air conditioning Pty Ltd is filed as John Brown Air conditioning Pty Ltd
Dr John Brown Miracle Cures Pty Ltd is files as Dr John Brown Miracle Cures Pty Ltd
Officeworks Ltd would be filed as Officeworks Ltd and would come after
Office Works Pty Ltd (if there were such a company) because of
the space between the words "office" and "works" (nothing before something rule).
Abbreviations:
That's a tricky one.
Usually it is filed as per their letterhead, not necessarily the logo.
ANZ is filed as ANZ, not Australia and New Zealand Banking Group Limited
CSIRO is filed CSIRO, not Commonwealth Scientific and Industrial Research Organisation
NDIS is filed NDIS, not
National Disability Insurance Scheme
However,
Australian Carers Pty Ltd is not filed as AC but the name in full, even though the logo is AC.
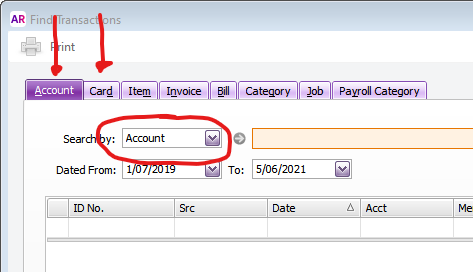
In the Command Centre:
Tip:
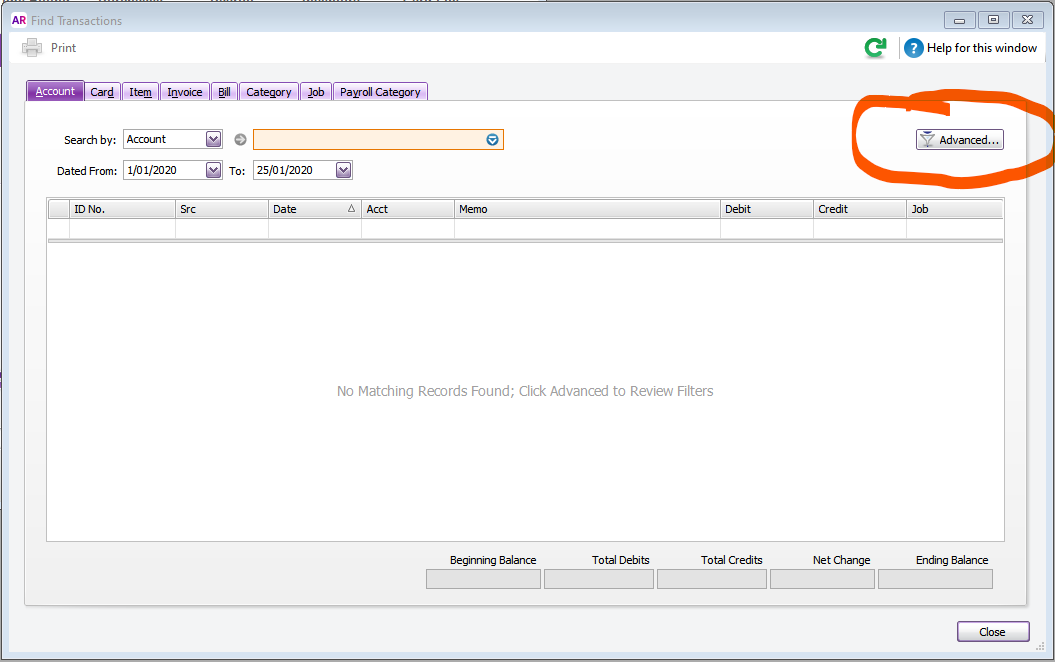
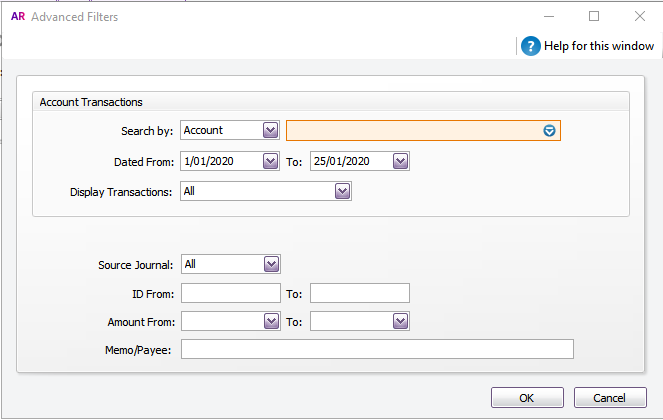
If you cannot find it, but are fairly sure it should be there,
Check you are searching under accounts by ALL accounts or
Under Cards by ALL cards.
By changing to all accounts we find a result:
if that doesn't work:
Use a longer date range, (in case the date was put in wrong)
search for different amounts (in case the amount was put in with/without GST, or transposition or transcription errors when the original was entered)
TAX CODES:
Anything we buy is code NCG (Non Capital expense, INCLUDING GST)
There are very, very few exceptions.
Anything we sell is code GST. -- There are NO exceptions. (Actually there are, but John only!)
Banking - Reconciliation - uploading bank transactions
Login to the Bank account with BankWest.
select the account you want to reconcile
at the bottom of the screen, select the period you want to reconcile
Select the format: Download in "quicken" format (extension should be .qif)
Save file on computer, or Rack Station in the BankWest folder.
Open the Reckon program in your browser.
Upload to the Host service, using the "Toolbox" "upload" button.
Find the file on the Rack Station or where you might have saved it in the previous step.
Select the file and click OPEN. This should now upload from local disk to online disk.
In Reckon, go to "Banking" menu tab.
select "Import Bank Statement".
In the "import Bank Statement", select the first "BROWSE" box. This opens a new window.
In the "Select QIF File" window, Look in: [Upload] -- select the file saved (this would be the most recent file).
if you cannot find it, sort by most recent date modified)
This will create a new file, name is in the "Save converted file as". Leave this name as is.
press arrow down on the "Account to import into" field.
Select the bank account. Click OK.
--The program will now convert the file,
Select: import new transactions now. Click OK.
New window: Select Bank account: "Use an existing Bank Account". Click "Continue".
Sometimes you cannot select any account and the [continue] button is greyed out. Then:
Select [create a new Reckon account] then re-select [Use an existing Reckon account] you should now be able to select the correct account and click [continue].
Create a PO (Purchase Order)
Open the Reckon program in your browser.
Click Supplier Centre,
This opens a new screen
In the [Find] Box type all or part of supplier's name.
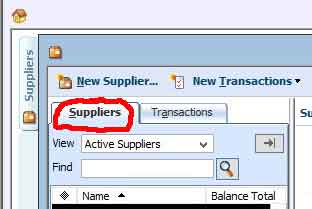
(if there is no [find] field,
make sure the [Suppliers] tab and not the [Transactions] tab is open),
Select supplier (click once)
This lists all transactions for that supplier.
on top of THIS screen, click "New Transactions"
select purchase order. The supplier's name has been filled out.
Enter the Class -- Hart and Hound OR Bottles
Enter Ship to:
This is "Hart and Hound Pty Ltd".
Failing to do this will create the PO box as the delivery address.
Entering the wrong name, will create the wrong delivery address.
Enter the item(s) you wish to order.
NOTE: If this is stock, find the "item" in the drop down box. You could type part of the item name.
Unfortunately, you have to type the name as it has been entered in the system.
Most times it is more reliable to type the supplier name first. That should give a list of all items from that supplier.
Note: if it is not a stock item, and you cannot find the correct one, use the generic item "Brewing related".
Under description enter the details.
Please do not start adding new items, especially if they are one-off small items.
Adding one item frequently costs more in time than what the item is worth.
Fill in quantity,
rate per item (select including or excluding tax at bottom left-hand corner of this form)
Tax code, (usually NCG
although some food items might be NCF, check with TC or JV if unsure)
Enter Class, H, B, K.
In the [Memo Filed] add your initials.
Save and Close.
NOTE: On occasion we have to pay for a PO before the goods are shipped to us.
This sometimes happens with a new supplier or items bought via Ebay.
If you are paying for this order, goto
Receiving order (delivery) of a PO, together with a bill.
We have not paid for this yet. We need to enter the invoice, pay for it, and record receipt of goods.
Enter Supplier Centre.
Find suppliers name.
On top of this window select "New Transactions"
In the drop down menu select "Receive items and enter Bill"
The program will warn that there is a outstanding PO (Purchase Order) for this supplier.
Accept that.
The system will populate the invoice document.
Check the quantity of the items received.
If there is a discrepancy e.g. a back order, adjust the quantity.
Save the invoice.
--
On top of this window select "New Transactions"
In the drop down menu select "Pay Bills"
The system will warn that there is an outstanding invoice.
accept that.
The system will populate the Cheque.
check bank account and click save and close.
Pay for PO before receiving the goods:
This seems simple but it's not.
You most likely have an invoice. However, you cannot enter the invoice, as "the system" assumes
you have also received the goods.
So you can only enter the payment, then enter the Invoice when you receive the goods.
Go to "Suppliers Centre"
Find supplier you wish to pay. (In the Find Field type part of the name, than press Ctrl-Enter)
Select Supplier, then highlight (don't open) the PO you wish to pay.
Go to menu "banking" drop down menu
Click "write a Cheque".
As soon as you click anywhere in the screen:
NOTE: at this point a pop-up window warns:
Select [NO] (You are paying for the PO, you are not receiving anything).
Select the Bank account from which to pay.
Under [No.] enter the Invoice number if you have one, otherwise leave blank.
Select the date of payment.
Enter the amount paid.
In the Memo area write a short description. Last 4 digits of CC + your initials. The Purchase Order number would also be useful.
On the next line are a number of items that need to be filled in:
Under Expense Account, type "883 Trade Creditors". Even if it's stock, use the [Expenses] Tab.
Under tax, LEAVE BLANK. This is just a Transfer, not an invoice.
You are transferring money to the account [Trade Creditors].
The "Gross amount" should already be filled in, as should the Tax amount.
Under Memo, write a short description.
Under Customer:Job, select the name of the supplier again.(You may have to make the field wider)
Billable is blank.
Enter the class of the transaction (Bottles or Hart and Hound). This should be the same as the purchase order.
Check that the amount of the cheque is still the same as the invoice amount.
Save and Close.
In the supplier centre,(in the left-hand column) check that the cheque is there as a negative amount.
(The amount does not include GST)
We received the items of a PO (purchase Order) - Before we paid for it
Go to "Suppliers Centre"
Find the supplier who sent the goods. (In the Find Field type part of the name, than press Ctrl-Enter)
Select the Supplier.
On top of THIS screen select drop down box [New Transactions]
Select [Receive Items] --- do NOT select [Receive items and enter bill]
The program will open new screen titled [Create Item Receipts].
The supplier should already be filled out.
Below the suppliers name is printed [Item Receipt Only]
NOTE: The tax amounts will be blank, as you are only receiving the items, not paying for them.
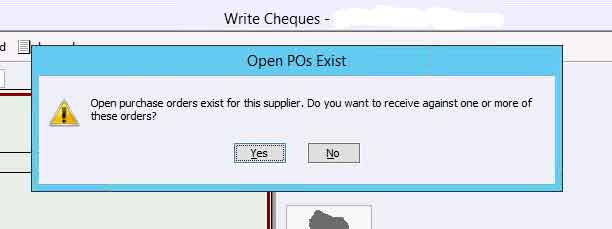
NOTE: When you try to enter anything,
A warning pops up: [Open PO exist]
Open purchase order exists for this supplier. Do you want to receive against one or more of these orders?
Click [YES]
A new screen pops up, listing the OPEN POs for this supplier.
Tick the one(s) this delivery applies to. That window will now close.
Enter the date you received the items.
In the memo field, It will state: [Received Items] add the PO number and your initials.
Check that all ordered quantities are received.
If it is wrong, adjust the quantities and/or cost.
AND Notify TC or JV ASAP.
Note: there is no TAX (GST) included.
Sometimes you receive part of an order and the rest a day or so later.
That second delivery HAS to be entered separately.
Save and Close.
In the transaction list it is now listed as Type "Item Receipt".
This will change AFTER you enter a bill.
Most likely you now have to enter the invoice: go here
We received the items of a PO (purchase Order) - AFTER we paid for it
Go to "Suppliers Centre"
Find the supplier who sent the goods. (In the Find Field type part of the name, than press Ctrl-Enter)
Select the Supplier.
On top of THIS screen select drop down box [New Transactions]
Select [Receive Items and enter Bill ] --- do NOT select [Receive items] -- do NOT select [Enter Bill for Received Items]
The program will open new screen.
The supplier should already be filled out.
NOTE: When you try to enter anything:
A warning pops up: [Open PO exist]
Open purchase order exists for this supplier. Do you want to receive against one or more of these orders?
Click [YES]
A new screen pops up, listing the OPEN POs for this supplier.
Tick the one(s) this delivery applies to. That window will now close.
NOTE: The items and tax amounts ARE FILLED IN, as you are receiving the items AND are charged for them.
Note: you have already paid for them, this will balance out that earlier transaction
Enter the date you received the items.
Enter the Invoice reference number.
In the memo field, add the PO number and your initials.
Check that all ordered quantities are received.
If it is wrong, adjust the quantities and/or cost.
AND Notify TC or JV ASAP.
(Sometimes you receive part of an order and the rest a day or so later.
That second delivery HAS to be entered separately. )
Under the [Expenses] Tab, there is an entry [883. Trade Creditors]. delete that line ( Ctrl Delete).
It will not save without that being deleted.
If you forget this, a warning will pop up:
You cannot use more than one A/R or A/P account in the same transaction.
Note: A/R (accounts receivable) A/P Accounts Payable.
Save and Close.
In the transaction list it is now listed as Type "IBill".
The balance total for the Supplier should now be $0.00
We received the items, some time ago, now we get an invoice (Bill) to enter and pay.
Go to "Suppliers Centre"
Find the supplier who sent the goods. (In the Find Field type part of the name, than press Ctrl-Enter)
Select the Supplier.
On top of THIS screen select drop down box [New Transactions] Important: Do not use [Enter Bill] OR Receive Items and enter Bill]
Instead: [Enter Bill for Received Items]
A new window opens, headed [Select Item Receipt]
Choose the item this refers to.
If it refers to more than one item, you have to enter each one separately.
When you make a payment you can pay all invoices in one transaction.
In the memo section state the PO number and your initials.
If the Bill (invoice) relates to multiple item receipts, note this in the memo, so we can trace what happened.
After saving the transaction, you will notice that the TYPE [Item Receipt] is now changed to [Bill].
Record tax refund:
General journal entry
Debit account money goes into
Credit 255.0 - Tax Payable Memo would be e.g. BAS, (Name should automatically be Australian Taxation Office) Class = Hart
Caltex Diesel (Clearing) Account:
General journal entry
Debit Caltex Diesel Account
Credit appropriate bank account Class is HH
Recording a returned payment to a supplier
This is what has happened:
The bill is the original invoice - debit expense, credit AP (Accounts Payable)
The payment is made - debit AP, credit Bank (paying above invoice)
The bill should now say "PAID".
The bank statement should show the money going out of the bank account (i.e. credited)
Now the payment is returned:
The payment is returned (for example the BSB or the account number was wrong)
The bank statement should show money going back into account (debited)
To fix this into the Reckon accounts:
Create a dummy bill, using the same details as the original bill; however, put the Bank account in account area
so where it was perhaps an "expense" type, it is now a "bank" type account; for example "the BankWest Bottle Account".
This will debit bank and credit AP (Accounts Payable), thereby building the historical transactions.
Reckon will now show that there is a payment outstanding.
Make payment again, using the new date - debit AP, credit bank (in reality you are repaying the original invoice, however you apply the payment to the dummy bill. Make relevant notes in memo area)
Also, bear in mind these transactions will take place within a day or so of each other and you are making notes in the memo area to link them to one another.
Recording a refund from a supplier e.g. return an item to Bunnings
This is what happened: You bought something from Bunnings. It's not what we want and we return the item to Bunnings, getting a full refund.
Two possibilities:
The item is returned for a full refund; however, other items were purchased at the time of refund, the total being equal to or greater than the refund. In other words, we needed to pay more.
or next line.
The item is returned for a refund; NO other items were purchased at the same time
or NO, see John.
Recording a refund at the same time as buying other items costing more than the refund.
You treat this as a normal receipt as if you are buying the item; however, this time you enter a negative amount for the returned item.
Then follow instructions for normal receipt here
Recording a refund NO other items costing more than the refund were purchased at the same time.
NOTE: Logic would suggest you would "write a cheque" to that supplier and have a negative amount. Simple.
Alas; The "System" will not allow this. Instead:
This is a 2-step process. Do all the steps, otherwise you stuff up the accounts and it will take a long time to fix it later!!
From the supplier Centre,Highlight the name of the supplier.
At the top of this window, under New Transaction, drop-Down list, Enter Bills.
At the top of the form there is a radio button for "Bill" and one for "Credit". Select Credit.
Name of the supplier should already be entered.
Enter the date of the refund
Enter the amount of the refund (this is now a positive amount).
Enter a Memo:
the last 4 digits of number of the credit/debit card
what is returned
the date of the original purchase
Select an expense account or item and enter an amount. Use the same expense account or item from the bill you originally entered for this supplier. If this is an inventory item, enter the correct quantity and the amount.
Enter a memo. This can be the same as above.
Enter a Class, the same as the original purchase.
before save and close - check that the [Amounts include Tax] has or has not been ticked. IOW The total credit amount should match the receipt. (Easy mistake to make)
Click "Save & Close". (End of part one) But wait; There is more! Don't stop now!!
All you have done so far is reduce (reverse) the expenses.
The money has not been returned to the bank account.
To do that you need the following:
---- The following steps does not always work -- goto step 12, to see my work around ----
From the Activities menu (BANKING menu), choose Make Deposits.
Note: This opens a window "Payments to Deposit". It's not on there. Don't select anything, -- Just click "OK".
This will get you to a new window: "Make Deposits".
Enter the name of the supplier in the "Received From" column.
Enter "883-Trade Creditors" (type of account is "Accounts Payable") in the "From Account" column.
Enter some Memo.
(Optional) Enter the cheque number and payment method
Enter the same class as was used for the original payment.
Enter the refund amount.
Click "Save &Close".
Note: The balance in supplier centre is now adjusted, but there is no entry
on the right-hand site with all the transactions.
The transaction is in the account register, and will show up as a
credit on the right-hand side of the Reconciliation Window.
This method seems to work
Make General Journal entry. (Menu -> Company, drop down box select "Make General Journal Entries...")
Enter the date of the refund
Important: Tick or Untick ["Amounts include Tax"] (bottom left of screen)
Enter the bank account DEBITED (we receive the money so you DEBIT the bank account)
Debit the refund amount
Leave Tax Item Blank !! Its a transfer from one account to another. nothing is purchased, therefor no GST
Enter a memo e.g. the item returned and the supplier. (supplier not absolutely necessary, just makes it easier to find later on)
Leave "NAME" blank
enter class (Same class as it is on the original bill/cheque)
next line:
under account enter 883-Trade creditors
CREDIT the amount
Leave Tax Item Blank !!Its a transfer from one account to another. nothing is purchased, therefor no GST
Memo can stay the same
Under NAME enter the supplier from which you received the refund
If there is no customer by that name, make sure you are in the customer centre and not the supplier centre
check spelling,
look for part of the name
check to see if the customer record or Purchase order, shows a different name
For example, Easy Lane might be under Windsor RSL
Or the customer might have a Trading Name rather than a "Legal Name"
Or the customer might have an abbreviation rather than the full name e.g. RLS or "Returned and Services League".
Otherwise, create a new customer.
Go to "new Transactions" drop down menu in this screen,
Select "Invoices"
Change class to Bottles or Hart
Change "Template"
Create customer
Set / Change standard Price
Go to menu
select "Lists"
from the drop down list, select "item List"
Find the item you want to change: be careful to find the correct one - there could be more than one with the same or similar names.
Double Click the item
This opens a new window.
half way down, it states "cost". To the right it states "Sales Price"
Add or change the price.
When clicking OK, there is a warning about changing the Custom Price List, as they could be affected by the change of the standard prices.
Set Price Level for a particular customer
Go to Customer Centre
Find the customer
Double click on the customer name
This opens
new window with customer details.
Click on the "Additional Info" tab
This should show the "Price Level" for that client.
Updating existing price level or creating new price level
go to the menu, select "lists"
in the drop down box, select "Price Level List"
This opens new window, with current price levels
Double Click on one to see or adjust the price.
This opens the item list.
This list shows the standard Price and the Custom price
There are two ways to set the price level:
Using a fixed price, this is independent of the standard price, or
Using a percentage of the standard price.
Using a fixed price:
1. Highlight the item
2. add or edit the custom price
3. Click "OK"
Using a percentage discount:
1.
To add or change the custom price, put a tick in front of the item.
To calculate the discount percentage,
(1-discounted price/standard price) times 100
for example: discounted price is $90, standard price is $100, percentage is
enter the percentage up to 5 decimals.
Click "Adjust".
The new custom price should show in the "custom Price" column.
Check to see if this new price makes sense. If the standard price is $100 and the new price is $10, something is most likely wrong. See James or John
Make adjustments if necessary (for example in rounding) in the custom price column.
Click OK.
Create Monthly Statements
Go to menu --"customers" (note this does not work from customer centre)
Drop down box: "Create Statements ..."
Select statement date e.g. 1st of the month
Select "All open Transactions as of statement date"
Tick "Only transactions over 30 days past due date" Change 30 to 1 days.
Select "All customers"
Tick "Show tax invoice item details on statements"
Under: Do not create statements:
Tick "With a zero balance"
Tick "with a balance less than 0.00"
Click "Preview".
Don't just send the statements, check to make sure they are okay. A lot of the time we say "Payment due on Receipt"; However, we would be happy with payment within 30 days.
Receive Cash or Cheque from customer
Go to Customer Centre
Find and highlight the customer
On top of this window, select "New Transactions" drop-down box.
Select "Receive Payments"
Note: Name of client is filled in.
On the bottom of this screen are all outstanding invoices.
Put a tick next to the invoice being paid. This fills in the the amount.
Select the "Pmt. Method" -- Cash or Cheque.
Enter the date it was paid, i.e. we received the money, not the day it was, or will be banked.
Fill in the Cheque number were appropriate.
Change deposit to "120.00 - Undeposited Funds". This is important!.
Click "Save & Close".
Put the money (with a note if cash) in the cash box.
Banking Cash or Cheque from customer.
When banking cash or cheque from a customer, that has previously deposited to "Undeposited Funds" i.e. the cash box, follow the following procedure.
Take the money from the cash box.
Please deposit the funds for each client as a separate transaction (note the client on the deposit slip). This is done to make reconciliation much easier.
In Reckon:
Go to menu "Banking"
Select from the drop-down box "Make Deposits".
Change Payment method type to "Cash and Cheque".
On the bottom of the screen are Undeposited funds.
Tick the one you want to deposit.
Click "OK". This opens a new window.
Select the "Deposit to:" Bank account.
Select the date it was deposited into the bank; NOT the date you received the money.
Select the correct class.
Click "Save and Close".
Setting up Employees in MYOB
Create new employee card:
Command Centre
Card File
Card List
Top Left hand corner - New
In the new window - Under the Profile Tab
Card Type - Employee
Designation - Individual
Surname, Capitalise
Under First name, add all given names
Fill in the rest.
Do NOT click OK
Click on the Payroll Details Tab
Enter DOB
Enter the rest.
Start date as per contract
Termination date - leave blank
Employment basis - Individual
Employment category - Temporary (check with John)
Employment status - Casual
Employment classification - as per contract
Click The Payment Details Tab
Payment Method - Electronic
fill in the bank details as per application form
If you do not have banking details, change Payment method to cheque.
Process Payroll
Log into Reckon and BankWest
In Reckon go to employee centre on the left-hand side there are 3 tabs Employees, Transactions, Payroll
Click the “payroll” tab, this will bring you to the pay employees and pay liabilities screen.
Click “start scheduled Payroll”
Ensure employees due for payment are ticked
If employee is on hourly rate click “open paycheck detail”
In earning column enter in hours worked that week
Click next and continue this for all employees then save and close
Click Continue
Go to BankWest make a payment section
Click Payroll
Enter in the description the week end of that payroll week e.g. WE 23/04/2017
Add employees and the Net amount shown in Reckon
Ensure total amount in BankWest matches Reckon
Once payment is complete go to Reckon and click “create Payment”
On the left-hand side above the 3 tabs click the drop-down “print” button then “email pay slips”
Enter date range for the current payroll then click OK
Click “send now”
Reckon Backup
Menu->File -> drop down box -> Save Copy or Backup -> New Window
Radio Button "Backup copy"
Click "Finish"
A dialogue box opens. Untick "Limit the number of saved on-demand backup copies to 3 per folder."
Untick "Remind me to Backup when I close my company files every 4 times".
Ensure radio button "Complete verification (recommended)" is selected.
Click OK
Previous dialogue box opens again: click "Finish" again.
-> All open windows are now being closed.
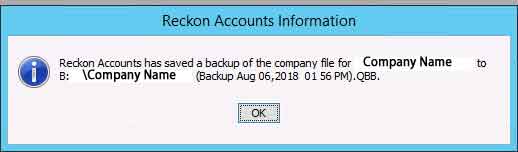
Backup is now in progress. It will verify data integrity, then do a backup.
This can take a few minutes.